The Ultimate Building System
The purpose of these pages is to describe what I consider to be the "ultimate" building technologies and to enlist your help in proving these technologies for the benefit of mankind. There is no greater need on earth than the need to empower the masses of humanity to help themselves by learning how to easily construct housing and vital life-support systems from very low cost raw materials in order to provide an environment of comfort, safety, efficiency, and beauty.
From experience we know that thin materials break easily and thick materials
are strong. Even a weak hollow core with thin outer surfaces is strong because
the hollow core allows the surface to act at a distance. We know to put the
strongest layer on the outside where it will do the most good. (See Engineering
Principles).

Now the question is: What materials should we use for the outer layer(s) and for the inner core? Also, we might ask about: a) application methods and b) forming methods to create the shapes we want.
Materials (formulas) and methods, that's all we need to know to change the world of building technology.
Strong Layer Materials (formulas)
This layer is made from 4 kinds of materials
- 1. Binder (usually portland cement)
- 2. Additives (to control properties)
- 3. Fillers (to add strength or other qualities)
- 4. Reinforcement (to add tensile strength)
Let's look at each of these in detail.
1. Binders
The binder creates compressive strength and holds the composite material together. A common low-cost binder is portland cement. Other binders include synthetic or natural resins and low-temperature ceramics, but these will require future research. For now, let's choose portland cement.
2. Additives
Two good additives for portland cement are;
* Acrylic Latex - Makes the cement less fragile, it replaces a portion of the mix water. It's sold as a white concrete bonding liquid. (The right stuff has a slight ammonia smell. Avoid other types.) Use for 1/4 to 1/2 of the water requirement.
* Acryl 60 - Doubles the strength of cement (one cup to a wheelbarrow of cement. ~$80 for 5 gal. Don't let freeze)
3. Fillers
For this layer the filler must be strong and fine enough to penetrate the reinforcement.
Candidates include: sand, ultra fine sand, rock dust, flyash from coal plants, borosilicate microballoons (insulating qualities)
4. Reinforcement
The usual reinforcement for concrete is rebar. But for thin layers, a distributed (ferrocement) reinforcement is better. Tensile reinforcement must be more rigid than the binder so it can take the stress before the binder cracks. It should be thin, flat and easily conform to the desired shape.
Candidates (in order of strength) include:
Iron Reinforcement: Expanded (diamond) metal lath, steel fibers from 3/4 to 1-1/2 inch long (80# per cubic yard), fence mesh or road underlayment wire mesh 4"x4" or 6"x6", 1/4" hardware cloth, netting or webbing such as poultry netting, screening (metal scrim 1/8" or better spacing). Metal mesh or scrim does not conform easily to curved surfaces.
Non-ferrous Reinforcement: Chemically resistant fiberglass mesh or discrete fibers, polyvinyl alcohol (PVA) fibers, high strength polyester fibers (recycled), rayon fibers, For natural fibers: raime, bamboo, industrial hemp, and jute (burlap).
Lightweight Core Materials
The core doesn't need to be so strong or dense, but lightweight. Use the same binders and/or additives, but with lightweight fillers and no (or little) reinforcement. The core is mostly filler(s). The ideal filler would be hollow pea-sized (and smaller) spheres of various sizes suitable for perfect packing. The spherical shape is the most difficult to compress and therefore the strongest. Available fillers include foam beads, plastic beads, perlite, foam bubbles. Innovations include pelletized cellulose, newspaper balls, etc. Any light round material will work. Cylindrical shapes and peanuts will also work, but round is best. Styrofoam regrind (recycled styrofoam) is also available cheap. The best material will also be water resistant so as not to affect the cement mix. Perlite isn't round and absorbs water but it's proven and cheap. Mix designs are available from the Perlite Institute at http://perlite.org. Generally, a 1:8 mix has a compressive strength of 80 psi which is far greater than needed for a core. It may be possible to make a core at 1:12 or 1:20 using any of these fillers. Air entrainment additives are also a good idea. Mix designs and material sources are needed and will be posted here for the various materials as they become available.
Application Methods
 To apply materials, we either must use manual methods or machines. Manual methods include shoveling, dumping, spreading, and throwing. There are many machines for pumping materials which are quite expensive either to rent or to purchase. A recent invention, the shovel-hopper sprayer, a kind of stucco sprayer, is a hybrid between manual methods and expensive machines. These are quite affordable, even with the purchase of the required air compressor. These sprayers will do a great job. They are able to spray concrete (aggregate up to 3/8"), stucco, clay-lime, clay slip for straw-clay applications, paper-crete, fiber-crete, hyper-tufa, ferro-cement, etc. It's available from www.mortarsprayer.com
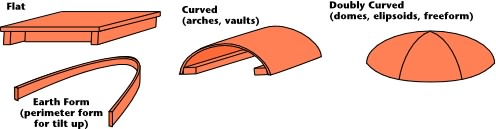
Forming Methods
Forms are of three types, 1) flat, 2) curved (in one dimension), or 3) double curved (in two dimensions). With these three shapes (and combinations of these), all manner of shapes can be built. For flat surfaces, plywood with 1x2 or 2x4 bracing is effective. It's difficult to keep plywood flat and prevent twisting without bracing. Using only a perimeter form, the flat earth (or leveled sand) can create forms for tilt up construction. They are quick and easy. For singly curved surfaces, thin plywood (1/4" - 3/8") or "door skin" (1/8") is effective with bracing along opposite edges. For doubly curved surfaces flat sheets won't work. The easiest doubly curved forms are made from inflatable forms which can be made from vinyl cutouts glued or heat-sealed together (old billboard vinyls are often free) or use polyethylene (6 mil poly) taped with wide (3"-5") duct tape.
Inflatable Forms
Ordinary forms are well understood, but inflatable forms need explanation. Loss of pressure can cause catastrophic failure so the inflation fan must run from an uninterruptable power supply... in this case, nothing more complicated than a deep cycle marine battery with an inexpensive 120v inverter. It is kept charged by an automotive charger. If power fails the battery has ample reserve. You could use the battery in your car if you don't let it drain too much, (occasional starting).

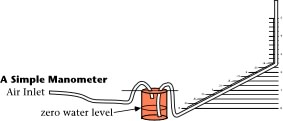
Use a small bathroom exhaust fan (designed for continuous use) to maintain pressure. Use any high volume fan (vacuum cleaner, automotive heater fan) for initial inflation. Vacuum cleaner motors are not designed for continuous use and will burn out. An automotive heater fan may work for both initial inflation and maintenance. Hose is cheap sump pump hose. Pressure is 1" to 2.5" of water column pressure, measure by making a simple manometer.
Making Inflatable Forms
The tricky part is cutting out the form shapes. It's best to experiment with models before making large forms (make models with thin poly and scotch tape).
The bottom is a simple square or hexagon. Simply cut to the size of the desired dome. The dome part is easy too if you make a template. Shown below is a template for a 12 ft. square dome. It can be made from kraft paper.
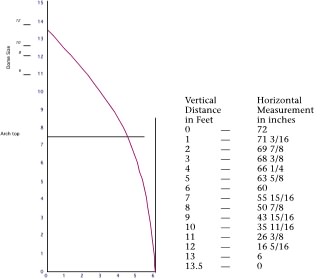
The balloon material is folded in half and cut out as shown with the left vertical edge along the fold. Cut only the curve. For all domes, regardless of size, the arch height will remain about the same because it's designed to be the height of a wall with an entry or windows. So the portion of the curve up to the "arch top" will change less than the other upper part for larger domes. These template designs need to be developed and shared.
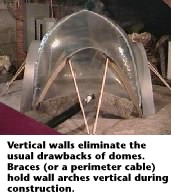
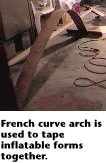
Taping curved surfaces together is difficult without an arch. A french curve arch is best because the edges change as you move along. The surface only needs to be as wide as the tape. Unevenly spaced partial cuts on the underside make the plywood bend unevenly to create a french curve. The horizontal board at one end keeps it from falling over. The bend is made taut with a cable or rope.
Design
In ordinary construction, due to expense, homes are designed with as many common walls as possible. While this is the usual practice due to economics, it is bad design from other perspectives. For instance, only corner rooms can have more than one wall with a window. Rooms with windows on only one side are less pleasing. In permaculture it is said that everything happens at the edges. This is true in home design as well. Edges make things interesting. Fewer windows or exits to the outside, less joy. Instead of using the motif of a box (house) divided into little boxes (rooms) we can consider other motifs. If we can build for little money anyway (using innovative methods), then we don't have to pack everything into a box. We can create more edges. Consider the snowflake as a motif and see what designs you can create. Courtyard designs also share this approach by creating both protected outdoor overlooks and access as well as exterior exposure.
The Approach
Now that we have an understanding of materials and forms, we need methods to put the two together. There may be high-tech approaches such as using expensive gunnite machines to apply materials and we may be able to build low-tech versions of machines to help. But most of us desiring a low-cost home don't have the money or skills for such adventures. We will focus on simple methods instead.
Pressures
Let's say we have created a form and are ready to turn that form into a structure. Ideally, we would like a strong layer, a lightweight core, and another strong layer. Since our form is not a high pressure form, (it will only support 5 psf for every inch of water column pressure), 1.5 to 2 inches of pressure will support a maximum 7.5 to 10 psf. More pressure can explode the form unless the form is quite strong. Also, the larger the form, the higher the tensile forces. For a 12 ft diameter balloon inflated to 1.5 column inches of water, the force on every inch of material trying to tear the balloon apart is about 2 pounds. For a 24 ft diameter dome, the force would be 4 pound on every inch of material. A lightweight core 2-4 inches thick should weigh much less than 5 pounds so it makes sense to build the core first to define the structure.
Methods of Building
The simplest building method is to erect a form and hand pack a lightweight core material over the form. After the core has set for 24 hours, then add a strong layer (after additional core, if desired). This approach is best if no inner layer is required. If a strong inner layer is desired, apply that first, then add a thinner core on top as you go. After setting, add more core and outer strong layer. If the core is not completed in one day, the boundary can be wetted with slurry and packing continued.
For houses, the lower level can be easily packed while standing on the ground and a scaffold can be used up to about 10 feet, but the upper part of the dome is not as easy because of the need to reach over the top. Either the shell will have to harden until a ladder can be leaned against it or a scaffold built. A simple pyramid frame can be built with cross bars to place walk boards or to lean ladders against. This scaffold should be erected before construction begins and tested to see that all parts of the balloon can be reached. Models are a good idea.
The Layers
Core material can be packed with rubber gloves and evened out with metal or wooden trowels, or even large rubber spatulas. A flexible rubber trowel (spatula) would be helpful for curved surfaces. For the strong layers, mixing the reinforcement with the slurry varies according to the kind of reinforcement. For webbing type of reinforcement, a thin layer of slurry is spread, the webbing applied, and another thin coat of slurry spread before the core is topped on. Or small patches of webbing are dipped in slurry and applied much like papier machŽ. For many fiber materials, a fiber rich slurry or a slurry-dipped fiber mat is spread before topping with core. Methods of applying fiber slurries, slurried mats, and slurried webbing are an ongoing area of research. In all cases it seems a core material applied immediately over the dense thin fiber layer will ensure better hardening without drying and help maintain placement.
Windows
Windows are typically a very costly component of housing. An ultra-low-cost window can be made by casting fiber cement slurry in a routed plywood form. The cast is then shrink wrapped and placed in the wall. Double walled windows can be made for a few dollars. As money allows the shrinkwrap is replaced with glass or other more permanent glazing material. Ventilation is separate from the window itself, either to the side, above, below or floor vented. An insulated vent cover prevents infiltration and controls flow. Windows do not open but could be kicked or pushed out in case of fire.
Walls and Window Frames
Window frames are cast into the walls as the walls themselves are cast. Walls are cast using perimeter earth forms with window or door frame inserts. The thin dense fiber layer is applied, then core. Walls are tilted into place with a block and tackle when cured and cemented in place. The interior is plastered or finished as desired after tilting vertical.
Doors
It may be possible to cast doors from core material. This is an area of research that needs to be done. Typical hollow core doors transmit quite a lot of sound and noise which disturbs privacy. Solid wooden doors are expensive. Both burn. A lightweight core door would be desirable but may not hold up to abuse. We hope to test the idea.
Research Agenda
There are several areas of research that are needed. If you would like to help,
look at the Research Agenda page to see what research
is NOT being done that you would like to do. Much of this research can be done
by phone calls and libraries. Other research will be hands-on testing. If you
would like to help, just email to volunteer and we'll put you on the agenda
for any item you would like to help with. More than one person can help with
any item.
- Reinforcing Materials (including strength test)
- Core material types and sources
- Mix designs
- Waterproofing
- Arch Design
- Balloon Template Design
- Inflation Devices
- Material Conveying or Pumping Devices
- Wall, Window, and Door Design
Note: Standardized tests. It would be best if we used a standard test so the results can be compared with other materials testing. I suggest a center-loaded beam with non-fixed (roller) ends. Can you suggest a simple standard (ASTM) test that any of us could perform to check materials? (a 3 day or 7 day cure would save time if it's possible). Perhaps a beam of standard dimensions placed on water pipe rollers could be center loaded with a bucket of sand. Sand is added until failure and the bucket weighed on a scale.
IPR Home |
Ultra Low-Cost Construction | Research
Agenda